I have a storied history of loving certain pairs of pants into the ground (Example 1. Example 2. And 3 — interestingly, the pink ones always seem to succumb to some kind of bloody accident). Let me tell you a tale about the most recent pair to meet their maker.
I can't remember when I got these flares, but I'm reasonably certain that I bought them used sometime between 5 and 10 years ago. They had plenty of spandex, and I loved how soft they were right from the outset! I wore them regularly for years, until I noticed they were starting to look a little too dingy and shabby for everyday use (not to mention that flared jeans had hit a low point in coolness). At that time, I designated them my official "hiking pants" and wore them exclusively for that purpose for another 2 years.
While on my recent trip to Mexico, however, they breathed their last when a huge rip opened up in the knee. My brother happily spent the whole trip wearing a pair of jeans with 2 gaping holes in the legs, but as soon as my pants did the same, I felt conspicuously trashy. Not to mention that since the jeans were stretchy and relatively tight, they caused my knee to poke out weirdly and uncomfortably when I bent my leg.
I briefly considered converting the flares to skinny jeans and shredding them a bit more to bring them up to trend. Holey jeans have come into fashion at least twice before in my lifetime, and now they are having another big moment. But then I decided that no matter how cool destroyed jeans may be, it has never been unacceptable to wear your jeans clean and intact—and that's how I prefer them. So I sadly bid my beloved pants adieu and placed them in the donation bag.
And then, I kept looking at fashion websites, and one thing popped out at me: cropped flares. Cropped flares first hit my radar last summer, and it looks like they're still on the cutting edge of fashion. Best of all, some of the pairs that I've seen advertised have lots of distressing, so my holey jeans would be the perfect candidates to make into crops.
Are you thinking what I'm thinking? It's time for a DIY!
I marked a spot on the inside of one leg that I thought would make a good length, then I stacked the legs together and cut through all four layers of fabric at once. Nice. I was basically done.
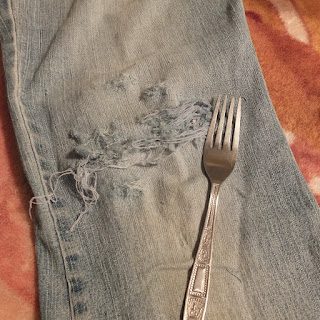
However, the hole in the knee still needed attention. Parts of it were fraying in a very trendy way, but it was still basically just a slit that was almost invisible when my leg was straight. So I set out to make the hole bigger.
I've never tried to distress a pair of jeans before, so I used a tutorial I found that suggested using a cheese grater or fork. I had just finished my dinner, so a fork it was!
I put a flattened cardboard box inside the leg to protect the back and provide a little support, and started scratching away. Horizontal strokes seemed to have the best results, as they broke the blue weft threads while leaving the heavier white warp threads intact.
In a bit of overzealous distressing, I accidentally stabbed my thumb and scraped up my pointer finger, so reader beware! Jean-destroying is a dangerous venture!
After widening the hole around my knee, I scratched up a few spots on the other leg for balance, then I threw the whole thing in the washing machine, to accelerate the fraying process and wash away any orphaned threads.
Now I turned my attention to the bottom hem. I wanted a really mega-frayed look, almost like fringe, which I could not achieve with the natural fraying process. So I decided to use the bottoms of the legs that I had already cut off, fray them thoroughly, and attach them to the new bottom edge.
I discovered that the best way to get a nice even fringe is to turn the fabric sideways (so what was originally parallel to the side seam now forms the bottom edge) and then pick out the blue weft threads one at a time with an unbent paper clip.
[Side note: the cardboard I'm using as a backdrop is the box that my compression stockings came in! And the orange bandage on my thumb is a direct consequence of my klutziness during the forking process]
After I'd peeled off several rows of blue threads, I finally had a nice fringe about a half-inch long.
I cut the fabric so the fringe was attached to a strip about 1 inch wide, then stitched several pieces of it together to form a long ribbon.
Then I sewed it onto the inside of the new bottom edge of my pants! I left the edges raw, so that the main body of fabric might fray a little to add to my fringe.
And when all was done, I had a fun pair of pants that I brought with me to New Orleans! In examining the pictures, I see that the pants almost look straight-legged, and they are a bit big on me, so I think in the future, I might tighten up the thigh area a little bit so that the bottom can look more flared!


No comments:
Post a Comment